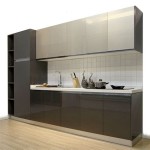
Can You Paint Old Laminate Cabinets? A Comprehensive Guide
Laminate cabinets, once a popular and economical choice for kitchens and bathrooms, often show their age. The surface may be worn, the color outdated, or the overall aesthetic no longer aligned with current design trends. Replacing these cabinets can be a significant expense, leading many homeowners to consider painting as a cost-effective alternative. However, painting laminate cabinets is not as straightforward as painting solid wood. It requires careful preparation, the right materials, and a meticulous approach to achieve a durable and aesthetically pleasing finish.
This article will delve into the process of painting old laminate cabinets, covering surface preparation, primer selection, paint application, and potential challenges. The goal is to provide readers with the necessary information to determine if painting their laminate cabinets is a feasible option and, if so, guide them through the process for optimal results.
Understanding Laminate and its Challenges
Laminate surfaces are typically composed of a thin layer of decorative paper bonded to a substrate such as particleboard or MDF (Medium-Density Fiberboard). This construction presents unique challenges when it comes to painting. Unlike wood, laminate is non-porous and lacks a natural grain for paint to grip onto. This inherent smoothness can lead to poor adhesion, resulting in chipping, peeling, and an overall unsatisfactory finish if not addressed properly. The slick surface needs to be altered to allow paint to adhere effectively. Furthermore, the edges and corners of laminate cabinets are particularly vulnerable to damage and require extra attention during preparation and painting.
The type of laminate also plays a role in the success of painting. Older laminate cabinets may have a smoother, more durable surface than newer, lower-quality versions. The smoother the surface, the more critical proper preparation becomes. Additionally, some laminates may have a sheen or texture that needs to be addressed before painting.
Before undertaking a painting project, it's imperative to assess the condition of the laminate. Cabinets with significant damage, such as warping, water damage, or severely peeling laminate, may not be suitable for painting. In such cases, replacement might be the more practical option.
Key Steps in Preparing Laminate Cabinets for Painting
The success of painting laminate cabinets hinges largely on thorough preparation. This involves cleaning, sanding, and applying a suitable primer. Skimping on these steps can significantly compromise the final result and lead to premature failure of the paint job.
Cleaning: The first step is to thoroughly clean the cabinets to remove any grease, dirt, or grime. A degreasing cleaner specifically designed for kitchens and bathrooms is recommended. Wipe down all surfaces with a clean cloth, paying particular attention to areas around handles and hinges where grease tends to accumulate. After cleaning, rinse the cabinets thoroughly with clean water and allow them to dry completely.
Sanding: Sanding is crucial for creating a slightly rough surface that will allow the primer to adhere effectively. Use a medium-grit sandpaper (around 120-180 grit) to lightly sand all surfaces of the cabinets, including doors, drawers, and frames. The goal is not to remove the laminate, but rather to create a profile for the primer to grip onto. Pay extra attention to edges and corners. After sanding, wipe down the cabinets with a tack cloth to remove all sanding dust. A vacuum cleaner with a brush attachment can also be used to remove dust from crevices and corners.
Priming: Applying a high-quality bonding primer is essential for ensuring proper adhesion of the paint. Choose a primer specifically designed for use on glossy surfaces, such as laminate or melamine. Epoxy primers are often recommended for their superior adhesion and durability. Apply the primer in thin, even coats using a brush, roller, or sprayer, following the manufacturer's instructions. Allow the primer to dry completely before proceeding to the next step. Some primers may require multiple coats for optimal coverage. After the primer has dried, lightly sand it with a fine-grit sandpaper (around 220 grit) to create an even smoother surface for the paint. Wipe away any sanding dust before painting.
Selecting the Right Paint and Application Techniques
Choosing the correct paint and applying it properly are critical for achieving a durable and aesthetically pleasing finish on laminate cabinets. The type of paint, the application method, and the number of coats all contribute to the final result.
Paint Type: Acrylic latex paints are generally recommended for painting laminate cabinets. They are durable, easy to clean, and available in a wide range of colors and finishes. Oil-based paints can also be used, but they require more preparation and take longer to dry. Alkyd paints offer a good compromise between the durability of oil-based paints and the ease of use of latex paints. Consider using a paint with a built-in primer for added adhesion and convenience. Choose a paint with a sheen that is appropriate for your desired look and the level of wear and tear the cabinets will endure. Semi-gloss and gloss finishes are more durable and easier to clean than matte finishes.
Application Techniques: Paint can be applied using a brush, roller, or sprayer. Each method has its advantages and disadvantages. Brushing is suitable for small areas and detailed work, but it can leave brushstrokes if not done carefully. Rolling is faster than brushing and can produce a smoother finish, but it may not be suitable for intricate designs or tight corners. Spraying provides the most even and professional-looking finish, but it requires specialized equipment and masking to protect surrounding surfaces. When using a brush or roller, choose high-quality tools designed for smooth surfaces. Apply the paint in thin, even coats, avoiding drips and runs. Allow each coat to dry completely before applying the next. Lightly sand between coats with fine-grit sandpaper to remove any imperfections and create a smoother surface.
Number of Coats: Typically, two coats of paint are required for adequate coverage and durability. However, depending on the color of the paint and the original color of the laminate, additional coats may be necessary. Allow each coat of paint to dry completely before applying the next. After the final coat of paint has dried, consider applying a clear topcoat for added protection and durability. Polyurethane topcoats are particularly durable and resistant to scratches and stains.
Addressing Potential Problems and Troubleshooting
Despite careful preparation and application, problems can sometimes arise when painting laminate cabinets. These issues may include poor adhesion, chipping, peeling, brushstrokes, and uneven coverage. Understanding the causes of these problems and knowing how to address them is essential for achieving a successful paint job.
Poor Adhesion: If the paint is not adhering properly to the laminate, it may be due to inadequate preparation. Make sure the cabinets are thoroughly cleaned, sanded, and primed. Use a high-quality bonding primer specifically designed for glossy surfaces. If the paint is still not adhering, try sanding the laminate more aggressively or using a stronger primer.
Chipping and Peeling: Chipping and peeling are often caused by poor adhesion or impact damage. To prevent chipping and peeling, ensure the cabinets are properly prepared and primed. Use a durable paint and apply a clear topcoat for added protection. If chipping or peeling occurs, sand the affected area, apply primer, and touch up with paint.
Brushstrokes: Brushstrokes can be minimized by using high-quality brushes designed for smooth surfaces and applying the paint in thin, even coats. Consider thinning the paint slightly to improve its flow and reduce brushstrokes. Sand lightly between coats to remove any imperfections. If brushstrokes are still visible, consider using a paint sprayer for a smoother finish.
Uneven Coverage: Uneven coverage can be caused by applying the paint too thinly or using a low-quality paint. Apply the paint in multiple coats, allowing each coat to dry completely before applying the next. Use a high-quality paint with good hiding power. If the coverage is still uneven, consider using a tinted primer to help block out the original color of the laminate.
By understanding the challenges of painting laminate cabinets and following the recommended steps for preparation, paint selection, and application, homeowners can successfully transform their outdated cabinets into a fresh and modern focal point of their kitchens or bathrooms.

How To Paint Laminate Kitchen Cabinets Perfect Finish Tips

A Year In Review Of How I Painted My Laminate Cabinets With Two Methods

How To Paint Laminate Cabinets Everything You Need Know

How To Paint Laminate Cabinets The Interiors Addict

Painting Kitchen Cabinets Without Primer

How To Paint Laminate Kitchen Cabinets Eatwell101

How To Paint Laminate Kitchen Cabinets Perfect Finish Tips

How To Paint Laminate Cabinets Without Sanding The Palette Muse

Painted Laminate Cupboards Kitchen Painting Cabinets

How To Paint Laminate Cabinets Love Renovations