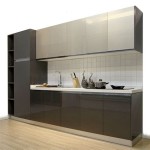
How To Paint a Kitchen Cabinet Door: A Comprehensive Guide
Painting kitchen cabinet doors offers a cost-effective alternative to replacing entire cabinets. This process allows homeowners to refresh the look of their kitchen, update the color scheme, and extend the lifespan of their existing cabinetry. A successful paint job requires careful preparation, proper technique, and the use of appropriate materials. This guide outlines the necessary steps to achieve a professional finish when painting kitchen cabinet doors.
Before commencing, it is crucial to assess the condition of the cabinet doors. Examine them for damage such as scratches, dents, or peeling veneer. Address any repairs before proceeding with painting. Additionally, determine the existing finish on the doors. This will influence the selection of primer and paint adhesion strategies. Laminate, wood stain, and previously painted surfaces may require different preparation methods.
Key Point 1: Preparation is Paramount
Proper preparation is the foundation of a durable and aesthetically pleasing paint job. Neglecting this stage can lead to adhesion problems, uneven coverage, and a finish that is prone to chipping and peeling. Thorough cleaning, sanding, and priming are essential steps that contribute to a professional outcome.
Removing the Doors and Hardware: Begin by removing all cabinet doors from their frames. Label each door and corresponding cabinet frame with painter's tape to ensure correct reinstallation. Remove all hardware, including hinges, knobs, and handles. Store hardware in a safe place to prevent loss or damage. Consider replacing old or worn hardware with new pieces to further enhance the updated look of the kitchen.
Cleaning: Clean the cabinet doors thoroughly to remove any grease, grime, or dirt. Use a degreasing cleaner specifically designed for kitchen surfaces. Apply the cleaner according to the manufacturer's instructions and scrub the doors with a non-abrasive sponge or cloth. Rinse the doors thoroughly with clean water and allow them to dry completely. This step is vital for ensuring proper paint adhesion.
Sanding: Sanding prepares the surface for priming and paint by creating a slightly rough texture that promotes adhesion. Use medium-grit sandpaper (around 120-grit) to lightly sand the entire surface of each door. Focus on removing any existing gloss or imperfections. For previously painted doors, feather the edges of any chipped or peeling paint to create a smooth transition. After sanding, use a tack cloth or a damp cloth to remove all sanding dust. This is a critical step, as any remaining dust will compromise the finish.
Priming: Applying primer is crucial for achieving a uniform color and ensuring proper paint adhesion. Choose a high-quality primer that is compatible with the existing surface and the type of paint you intend to use. Oil-based primers are generally recommended for cabinets in high-use areas, as they provide a durable and stain-blocking base. However, water-based primers offer easier cleanup and lower VOC emissions. Apply the primer in thin, even coats using a brush, roller, or sprayer. Allow the primer to dry completely according to the manufacturer's instructions. Lightly sand the primed surface with fine-grit sandpaper (around 220-grit) to remove any imperfections and create a smooth surface for painting. Remove sanding dust with a tack cloth before proceeding.
Key Point 2: Selecting the Right Paint and Tools
The choice of paint and tools significantly impacts the final result. Selecting appropriate products will lead to a more durable, visually appealing, and easier-to-maintain finish. Consider the durability requirements, desired sheen, and application method when making these selections.
Choosing the Right Paint: For kitchen cabinets, durability and ease of cleaning are essential. Semi-gloss or satin finishes are generally recommended, as they are resistant to moisture and stains and can be easily wiped clean. Alkyd (oil-based) paints offer excellent durability and a hard, smooth finish, but they require mineral spirits for cleanup and have higher VOC emissions. Acrylic (water-based) paints are more environmentally friendly, easier to clean up, and dry faster. High-quality acrylic paints formulated for cabinets can provide excellent durability and a beautiful finish. Consider using a paint specifically designed for kitchen cabinets for optimal results.
Selecting the Right Tools: The application method will influence the type of tools needed. Using high-quality brushes and rollers is crucial for achieving a smooth, even finish. For brushing, choose a high-quality synthetic brush with fine bristles. For rolling, use a foam roller with a nap appropriate for the paint type. A paint sprayer can provide the most even and professional-looking finish, but it requires practice and proper setup. If using a sprayer, ensure proper ventilation and wear appropriate safety gear, such as a respirator. Other essential tools include paint trays, painter's tape, drop cloths, and stir sticks.
Testing the Paint: Before painting all the doors, test the paint in an inconspicuous area to ensure proper adhesion and color accuracy. Apply a small amount of paint to the back of a door and allow it to dry completely. Check for any signs of peeling, cracking, or poor adhesion. If any problems arise, adjust the preparation method or paint selection accordingly.
Key Point 3: Applying the Paint with Precision
The application of the paint requires patience and attention to detail. Applying thin, even coats and allowing sufficient drying time between coats is crucial for achieving a professional finish that is free of drips, runs, and brushstrokes.
Protecting the Work Area: Before painting, protect the surrounding work area with drop cloths to prevent paint spills and splatters. Use painter's tape to mask off any areas that you do not want to be painted, such as walls or countertops.
Applying the First Coat: Apply the first coat of paint in thin, even strokes. Whether using a brush, roller, or sprayer, avoid applying too much paint at once, as this can lead to drips and runs. If brushing, work with the grain of the wood. If rolling, use a light touch to avoid creating stipple marks. If spraying, maintain a consistent distance from the surface and overlap each pass slightly. Allow the first coat to dry completely according to the manufacturer's instructions.
Sanding Between Coats: After the first coat of paint is dry, lightly sand the surface with fine-grit sandpaper (around 320-grit) to remove any imperfections and create a smooth surface for the second coat. Remove sanding dust with a tack cloth before proceeding. This step is crucial for achieving a professional-looking finish.
Applying Subsequent Coats: Apply subsequent coats of paint in the same manner as the first coat. Two coats of paint are typically sufficient for achieving full coverage and a durable finish. However, depending on the color and type of paint used, a third coat may be necessary. Allow each coat to dry completely before applying the next.
Removing Painter's Tape: After the final coat of paint is dry to the touch, carefully remove the painter's tape. Score the edge of the tape with a utility knife to prevent the paint from peeling off with the tape. Remove the tape slowly and at a 45-degree angle.
Curing the Paint: Allow the paint to cure completely before reinstalling the cabinet doors and hardware. Curing typically takes several days or even weeks, depending on the type of paint used. Consult the manufacturer's instructions for specific curing times. During the curing process, avoid touching or handling the painted surfaces as much as possible.
Reinstalling the Doors and Hardware: Once the paint is fully cured, reinstall the cabinet doors and hardware. Use the labels you created earlier to ensure that each door is reinstalled in its correct location. Align the hinges properly and tighten the screws securely. Install the knobs and handles according to the manufacturer's instructions.
Finally, inspect the finished cabinet doors for any imperfections. Touch up any areas as needed with a small brush. Clean the surrounding work area and dispose of any used paint or materials properly. With careful preparation, proper technique, and high-quality materials, the repainted kitchen cabinet doors will provide a fresh and updated look to the kitchen for years to come.

Diy Kitchen Cabinet Painting The Easy Way

How To Paint Kitchen Cupboard Doors The Hub

The Easy Way To Paint Your Kitchen Cabinets More Mrs E

How To Paint Cabinets

Cabinet Refinishing Guide

The Best Way To Paint Kitchen Cabinets No Sanding Palette Muse

The Average Diy Girl S Guide To Painting Cabinets

Before And After Diy Painted Kitchen Cabinets Reinvented Delaware

How To Paint Cabinet Doors Remodelaholic

How To Paint Kitchen Cabinets A Step By Guide Confessions Of Serial Do It Yourselfer