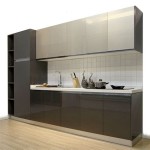
Can You Paint Over Veneer Kitchen Cupboards?
Kitchen renovations can be expensive and time-consuming. For homeowners looking to update their kitchen's aesthetic without a complete overhaul, painting existing cabinets often emerges as a viable and cost-effective alternative. However, the question of whether one can successfully paint over veneer kitchen cupboards arises frequently. The answer is yes, but it requires meticulous preparation and the correct techniques to achieve a durable and aesthetically pleasing finish. Understanding the properties of veneer and the appropriate painting process is paramount to a successful outcome.
Veneer, in the context of kitchen cabinetry, refers to a thin layer of real wood adhered to a substrate, typically particleboard or MDF (Medium Density Fiberboard). This construction method offers several advantages, including reduced material costs compared to solid wood, increased dimensional stability, and the ability to create complex designs. While veneer provides the appearance of solid wood, its surface is significantly different and requires specific considerations when painting. Failing to account for these differences can lead to paint adhesion issues, peeling, and an overall unsatisfactory result.
Key Point 1: Assessing the Veneer's Condition and Identifying the Type
Before embarking on a painting project involving veneer kitchen cupboards, a thorough assessment of their condition is essential. Examine the veneer for any existing damage, such as chips, cracks, peeling, or water damage. These imperfections must be addressed before painting to ensure a smooth and even surface. Small chips can be filled with wood filler, while larger areas of peeling veneer may require re-gluing or, in severe cases, replacement of the affected panel.
Identifying the type of veneer and its existing finish is also crucial. Different types of veneer, such as rotary-cut, plain-sliced, or quarter-sliced, may exhibit varying grain patterns and react differently to sanding and priming. Similarly, understanding the existing finish – whether it's a lacquer, varnish, or stain – will inform the selection of the appropriate cleaning agents and primers. A simple test can be performed by applying a small amount of paint thinner to an inconspicuous area. If the finish softens or dissolves, it's likely a lacquer or varnish. If it resists the paint thinner, it's likely a more durable finish, such as polyurethane, which will require more aggressive sanding.
Old or heavily soiled veneer can be particularly challenging to paint. Grease, grime, and food splatters can create a barrier that prevents paint from adhering properly. Thorough cleaning with a degreasing agent is critical to remove these contaminants. In some cases, extensive cleaning and degreasing might reveal underlying damage that was previously concealed by the dirt and grime. It is important to address these issues before moving on to the next step.
Key Point 2: Proper Preparation: Cleaning, Sanding, and Priming
The success of painting veneer kitchen cupboards hinges on meticulous preparation. This process typically involves three key steps: cleaning, sanding, and priming. Each step plays a vital role in creating a suitable surface for paint adhesion and ensuring a long-lasting, professional-looking finish.
Cleaning should be conducted with a dedicated degreasing cleaner specifically formulated for kitchen surfaces. These cleaners are designed to remove grease, oil, and other contaminants that can impede paint adhesion. Apply the cleaner according to the manufacturer’s instructions and thoroughly rinse the surface with clean water. Allow the cupboards to dry completely before proceeding to the next step.
Sanding is crucial for creating a "tooth" for the primer to grip onto. Use a fine-grit sandpaper (around 220-grit) to lightly sand the veneer surface. The goal is not to remove the veneer entirely but to create a slightly roughened surface that promotes adhesion. Sand with the grain to avoid scratching or damaging the veneer. After sanding, thoroughly remove all sanding dust with a tack cloth or a vacuum cleaner with a soft brush attachment. Skipping this step can lead to uneven paint application and poor adhesion.
Priming is arguably the most important step in painting veneer kitchen cupboards. A high-quality primer acts as a bonding agent between the veneer surface and the paint, ensuring proper adhesion and preventing the paint from peeling or chipping. Choose a primer specifically formulated for wood or laminate surfaces. Oil-based primers are generally considered to offer superior adhesion, but water-based primers are also suitable and offer the advantage of lower VOC (Volatile Organic Compounds) emissions. Apply the primer in thin, even coats, following the manufacturer’s instructions. Allow the primer to dry completely before proceeding to the painting stage. Multiple coats of primer may be necessary, especially if the veneer is stained or has a dark finish. Lightly sand the primed surface with fine-grit sandpaper to remove any imperfections before applying the paint.
Key Point 3: Selecting the Right Paint and Applying the Finish Coats
Choosing the right paint is another critical factor in achieving a durable and aesthetically pleasing finish on veneer kitchen cupboards. Acrylic latex paints are generally recommended due to their durability, ease of application, and low VOC content. These paints are available in a wide range of colors and sheens, allowing homeowners to customize the look of their kitchen. Semi-gloss or gloss finishes are often preferred for kitchen cabinets as they are easier to clean and more resistant to moisture and stains.
When applying the paint, use high-quality brushes, rollers, or a paint sprayer. Brushes are ideal for detail work and tight corners, while rollers are suitable for larger, flat surfaces. Paint sprayers offer the advantage of a smooth, even finish but require more skill and preparation to avoid drips and runs. If using a paint sprayer, ensure proper ventilation and wear appropriate safety gear, such as a respirator.
Apply the paint in thin, even coats, allowing each coat to dry completely before applying the next. Multiple thin coats are preferable to one thick coat, as they reduce the risk of drips, runs, and uneven drying. Lightly sand between coats with fine-grit sandpaper to remove any imperfections and create a smooth surface for the subsequent coat. After the final coat of paint has dried completely, consider applying a clear topcoat for added protection and durability. A clear polyurethane or acrylic topcoat can help to resist scratches, stains, and moisture damage, extending the lifespan of the painted finish.
Proper drying time is essential for ensuring a durable and long-lasting finish. Follow the manufacturer’s instructions for drying times between coats and before putting the cabinets back into use. Rushing the drying process can lead to soft paint, poor adhesion, and an overall unsatisfactory result. Allow the paint to cure completely before reinstalling hardware and placing items inside the cabinets.
Finally, consider the hardware. Replacing old or dated hardware can significantly enhance the overall appearance of the painted cabinets. Choose hardware that complements the paint color and style of the kitchen. New knobs, pulls, and hinges can instantly update the look of the cabinets and contribute to a more cohesive and stylish kitchen design.

How To Paint Veneer Cabinets For A Long Lasting Finish Anika S Diy Life

8 Smart Steps To Painting Veneer Cabinets Spahn Rose Lumber Co

How To Paint Veneer Cabinets For A Long Lasting Finish Anika S Diy Life

How To Paint Veneer Cabinets For A Long Lasting Finish Anika S Diy Life Painting Laminate Kitchen

How To Paint Veneer Cabinets For A Long Lasting Finish Anika S Diy Life Painting Laminate Furniture

Should I Paint My Kitchen Cabinets Helix Painting

How To Paint Laminate Kitchen Cabinets Perfect Finish Tips

How To Paint Kitchen Cabinets Without Sanding Or Priming

A Year In Review Of How I Painted My Laminate Cabinets With Two Methods

A Diy Guide To Painting Laminate Furniture Beamin Moore