Can You Paint Over Wood Kitchen Cabinets? A Comprehensive Guide
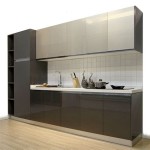
Painting wood kitchen cabinets is a cost-effective and practical method for revitalizing the heart of a home. Rather than undertaking a full cabinet replacement, a fresh coat of paint can dramatically alter the aesthetic, providing a modern or updated look without the significant expense and disruption of a remodel. While the process appears straightforward, achieving professional-looking results requires meticulous preparation, the correct materials, and a thorough understanding of the steps involved. This article provides a comprehensive guide to painting wood kitchen cabinets, covering key aspects from surface preparation to the final coat.
Understanding the Suitability of Painting
Before embarking on a cabinet painting project, it's crucial to assess the existing condition of the wood. Certain wood types and finishes are more conducive to painting than others. Solid wood cabinets are generally excellent candidates for painting. However, cabinets with extensive damage, warping, or severely peeling laminate may require more extensive repairs or even replacement. Consider the existing finish as well. High-gloss or heavily lacquered surfaces present challenges in adhesion, necessitating more aggressive preparation techniques. It is always advisable to test a small, inconspicuous area to ensure the paint adheres properly and provides the desired aesthetic before committing to the entire project.
Furthermore, understand the type of paint that is going to be used. Different types of paint will have different effects on the wood, and it is important to do your research to see which one is the right one for the specific type of wood the cabinets are made of.
Essential Preparation Steps
Proper preparation is paramount for achieving a durable and aesthetically pleasing paint job. Skimping on these initial steps can lead to paint failure, including peeling, chipping, and uneven coverage. The preparation process includes removing hardware, cleaning the cabinets, sanding the surfaces, and applying a primer.
Removing Hardware: Begin by carefully removing all cabinet doors and drawers. Label each door and drawer with corresponding numbers or letters to ensure proper reinstallation. Remove all knobs, pulls, hinges, and other hardware. Store the hardware in a safe place to prevent loss or damage. If desired, this is an opportune time to replace the hardware with new styles to further enhance the updated look of the kitchen.
Cleaning the Cabinets: Thoroughly clean all cabinet surfaces to remove grease, grime, and any other contaminants that could interfere with paint adhesion. Use a degreasing cleaner specifically formulated for kitchen surfaces. Trisodium phosphate (TSP) is a powerful cleaning agent, but it requires careful handling due to its caustic nature. Follow the manufacturer's instructions and wear appropriate protective gear, including gloves and eye protection. Rinse the cabinets thoroughly with clean water to remove any remaining cleaner residue. Allow the cabinets to dry completely before proceeding.
Sanding the Surfaces: Sanding creates a slightly roughened surface that allows the primer and paint to adhere properly. Use a medium-grit sandpaper (around 120-180 grit) to lightly sand all cabinet surfaces. Focus on scuffing the existing finish rather than completely removing it. For intricate details or hard-to-reach areas, use a sanding sponge or a detail sander. After sanding, wipe down the cabinets with a tack cloth to remove all sanding dust. Vacuuming the surrounding area is also recommended to prevent dust from settling back onto the cabinets.
Applying Primer: Primer is a crucial step in painting wood cabinets. It provides a uniform surface for the paint to adhere to, seals the wood, and prevents tannins from bleeding through the paint. Choose a high-quality primer specifically designed for wood cabinets. Oil-based primers offer excellent adhesion and stain-blocking properties, but they require mineral spirits for cleanup and have a longer drying time. Latex primers are easier to clean up and have lower VOC (volatile organic compound) emissions, but they may not be as effective at blocking stains. Apply the primer in thin, even coats using a brush, roller, or sprayer. Allow the primer to dry completely according to the manufacturer's instructions before proceeding to paint.
Choosing the Right Paint and Application Techniques
The type of paint used significantly impacts the final appearance and durability of the painted cabinets. Several options are available, each with distinct advantages and disadvantages.
Alkyd Paint: Alkyd paints, also known as oil-based paints, are known for their durability and smooth finish. They offer excellent adhesion and are resistant to chipping and scratching. However, they have a longer drying time and require mineral spirits for cleanup. Alkyd paints also contain higher levels of VOCs, which can contribute to air pollution.
Latex Paint: Latex paints are water-based and have lower VOC emissions than alkyd paints. They are easier to clean up and dry more quickly. While they may not be as durable as alkyd paints, advancements in latex paint technology have resulted in products that offer excellent performance for kitchen cabinets. Look for acrylic latex paints specifically designed for cabinets and trim.
Acrylic Paint: Acrylic paints are more durable and flexible than latex paints making them less prone to cracking and chipping. They also tend to have better adhesion than latex paints on glossy or slick surfaces given adequate preparation.
Application Techniques: The application method influences the smoothness and uniformity of the painted finish. Brushing, rolling, and spraying are common techniques used for painting cabinets.
Brushing: Brushing is a traditional method that is suitable for smaller projects or intricate details. Use a high-quality brush with synthetic bristles to minimize brushstrokes. Apply the paint in thin, even coats, working in the direction of the wood grain. Avoid applying too much pressure, which can cause the paint to drip or sag.
Rolling: Rolling is an efficient method for covering large, flat surfaces. Use a small, high-density foam roller to achieve a smooth finish. Apply the paint in thin, even coats, overlapping each stroke slightly. Avoid pressing too hard on the roller, which can cause the paint to splatter.
Spraying: Spraying provides the most professional-looking finish, as it eliminates brushstrokes and roller marks. Use a high-volume, low-pressure (HVLP) sprayer or an airless sprayer. Thin the paint according to the manufacturer's instructions to ensure proper atomization. Apply the paint in thin, even coats, overlapping each stroke by 50%. Wear appropriate respiratory protection when spraying to avoid inhaling paint fumes.
Regardless of the application method, apply two to three thin coats of paint, allowing each coat to dry completely before applying the next. Lightly sand between coats with a fine-grit sandpaper (around 220 grit) to remove any imperfections and improve adhesion for the subsequent coat. Wipe down the cabinets with a tack cloth after each sanding.
Reassembly and Final Touches
Once the final coat of paint has dried completely, carefully reassemble the cabinets. Reattach the hinges and install the doors and drawers. Ensure that the doors and drawers are properly aligned and that they open and close smoothly. Replace the knobs, pulls, and other hardware. Clean up any paint splatters or drips. If desired, apply a clear topcoat to protect the painted finish and enhance its durability. Follow the manufacturer's instructions for applying the topcoat.
Allow the painted cabinets to cure completely for at least 24 to 48 hours before using them. Curing allows the paint to fully harden and become more resistant to scratches and chips. Avoid placing heavy objects on the cabinets during the curing process.
While the process of painting cabinets seems simple, a professional will have the proper tools to ensure a factory finish. If the homeowner wants a perfect finish, it's a good idea to hire professionals for the job.

Exactly How To Paint Oak Cabinets Written By A Pro Painted Kayla Payne

How To Paint Laminate Cabinets Without Sanding The Palette Muse

Cabinet Refinishing Guide

How To Paint Grainy Oak Cabinets And Get A Smooth Finish

Should I Paint My Kitchen Cabinets

How To Paint Kitchen Cabinets The Love Notes Blog
:strip_icc()/101671998-27cdf40f639448d0a56ff6c7eab609d7.jpg?strip=all "Expert Tips For Painting Oak Cabinets")
Expert Tips For Painting Oak Cabinets

How To Paint Maple Kitchen Cabinets Step By Painting Tutorial

Diy Painted Oak Kitchen Cabinets Makeover

How To Paint Veneer Cabinets For A Long Lasting Finish Anika S Diy Life